हैलो दोस्तों Gujarati Help Guru में आपका स्वागत है। आज की पोस्ट मे हम आपको Blogger Blog में HTTPS Enable करने के बारे में पूरी जानकारी देंगे. आप जानेंगे कि HTTPS क्या होता है? और Blogger Blog में HTTPS Enable कैसे करते है? Blogger Blog में HTTPS Enable करने से पहले हम बात करेंगे कि ये HTTPS आखिर क्या बला हैं और HTTPS का उपयोग क्यों करना चाहिए?
ये Blogger Post for Beginners To Advance in Hindi Series का 33 मा Tutorial है. आपको सभी Tutorial पढ़ना है तो यहाँ क्लिक करे Blogger Tutorial In Hindi
HTTPS क्या हैं – What Is HTTPS In Hindi?
HTTPS का पूरा नाम Hyper Text Transfer Protocol Secure हैं. यह File Transfer Protocol का सुरक्षित संस्करण हैं.
इससे पहले HTTP इस्तेमाल होता था. अब HTTPS का उपयोग होता हैं. HTTPS में “S” का मतलब ‘Secure’ होता हैं.
HTTPS ने Standard File Transfer Protocol (HTTP) को Replace किया हैं. जिसकी वजह से संप्रेषण और डाटा का आदान-प्रदान ज्यादा सुरक्षित हुआ हैं. क्योंकि HTTPS से संपेषण Encrypted होता हैं. जिसे केवल Sender और Receiver ही पढ सकता हैं.
HTTPS का इस्तेमाल पहले E-Commerce Websites के लिए होता था. जहाँ पर Users की पेमेंट डिटेल्स को सुरक्षित रखने के लिए ऐसा किया जाता था. मगर आजकल सभी प्रकार की वेवसाईट यहाँ तक Personal Blogs के लिए भी HTTPS को इस्तेमाल करना अनिवार्य कर दिया गया हैं.
ये सभी कार्य इंटरनेट यानि WWW को एक सुरक्षित स्थान बनाने के लिए किया जा रहा हैं. जिसमे Google का बहुत योगदान हैं.
HTTPS Enable करने के फायदें
- HTTPS से वेबसाईट पहले से ज्यादा सुरक्षित बनती है. इसलिए विश्वसनियता में बढोतरी होती हैं.
- Website/Blog Server और User Client (Browser) के बीच आदान-प्रदान होने वाला डाटा गोपनीय रहता हैं.
- किसी तीसरे आदमी द्वारा डाटा चुराने की संभावना खत्म सी हो जाती हैं.
- Google को HTTPS Ranking Factor मानता हैं. इसलिए आपकी Search Ranking में भी बढोतरी होगी.
- और आपके ब्लॉग तथा वेबसाईट पर Traffic Increase होगा.
Blogger Blog में HTTPS Enable करने का तरीका
—Step: #1—
Blogger.com पर जाकर गूगल अकाउंट से Log in कीजिए. Log in करने के लिए आप अपनी Gmail ID और Password का इस्तेमाल करें. और उसी अकाउंट का इस्तेमाल करे जिससे आपने ब्लॉगर पर Sing in किया था.
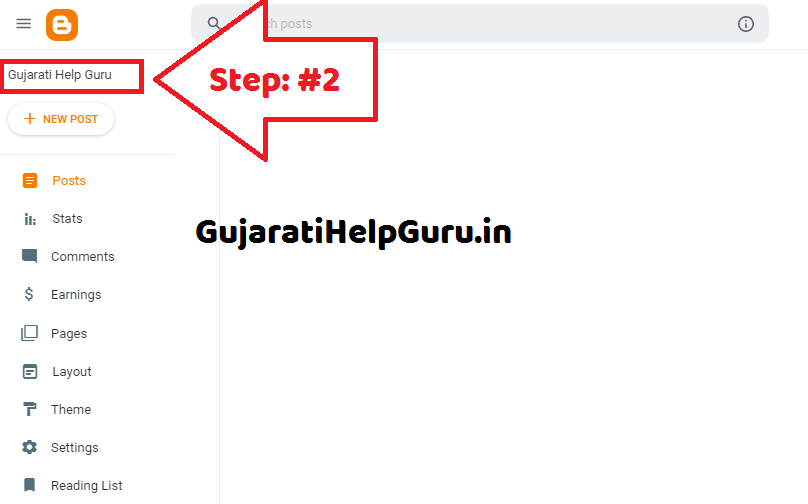
—Step: #2—
Blogger पर लॉग इन करने के बाद आपके सामने Blogger Dashboard खुल जायेगा. यहाँ से आप Blog List से Down Arrow ⌄ की सहायता से अपना ब्लॉग सेलेक्ट कर लें.
मतलब आप जिस Blogger Blog को अपडेट करना चाहते है.
- अगर आपके पास एक से ज्यादा ब्लॉग है तो.
- अगर आपके पास केवल एक ही ब्लॉग़ है तब आप ये स्टेप छोड दें.

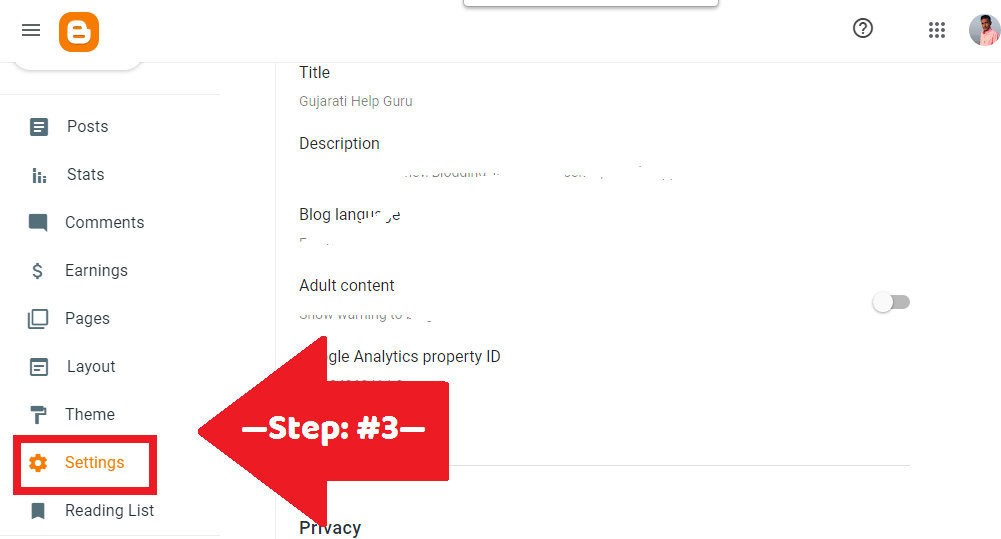
—Step: #3—
अब आपके सामने Blog Specific Dashboard Open होगा. यहाँ से आप बांए तरफ मौजूद Settings पर क्लिक कीजिए.

—Step: #4—
ऐसा करने पर आपके सामने Blogger Settings Expand हो जायेगि. यहाँ से आप निचे Scroll कीजिए. यहाँ पे आपको HTTPS दिखाई देगा.

—Step: #5—
HTTPS के अंदर मौजूद HTTPS Redirect पर जाएं. जो आपको Off पर सेट हुई मिलेगी.

—Step: #6—
अब आपको इस Off पर क्लिक करना है और इसे सेटिंग को ON कर देना है. जैसे ही आप ON करेंगे सेटिंग स्वत: सेव हो जाएगी. और आपके ब्लॉग पर HTTPS Enable हो जाएगा.

बधाई हो !! आपके Blogger Blog में HTTPS Enable हो चूका है
अब आप View blog पर जाकर अपने ब्लॉग को देख सकते है. आपको Browser की Address Bar में Blog URL के पहले Green Padlock दिखाई दे रह होगा. इसका मतलब अब आपके ब्लॉग पर HTTPS Enable हो चुका हैं. .
FAQ: Blogger Blog में HTTPS Enable
How do I enable https on Blogger?
To turn on HTTPS for your custom domain blog:
1. Sign in to Blogger.
2. In the top left, click the Down arrow.
3. Select the blog to update.
4. HTTPS Redirect Blogger Blog में HTTPS EnableIn the left menu, click Settings Basic.
5. On the right, under “HTTPS” and “HTTPS Availability,” select Yes.
Does BlogSpot have SSL?
It is good news for all those who use Google Blogger; now, you can enable HTTPS on a Blogger blog with a custom domain. Enabling Blogger HTTPS means your blog has an SSL certificate. Blogger SSL helps to establish a secure connection between your blog and users
How do I make my Blogger blog secure?
How to make your BlogSpot Blog HTTPS enabled for free:
1. log in to your BlogSpot dashboard.
2. Click on the dropdown & go to your blog settings.
3. Go to Settings > Basics & look for HTTPS Settings option.
4. From the HTTPS availability dropdown, select yes & save the option.
How do I enable https?
How to properly enable HTTPS on your server
1. Host with a dedicated IP address.
2. Buy an SSL certificate.
3. Request the SSL certificate.
4. Install the certificate.
5. Update your site to enable HTTPS.
Why is Blogger not secure?
3. Fix the Errors. On my site the typical reason why a blog post is not secure is because of something called an insecure image call. Usually, this happens when I embed a banner ad in the body of my blog post or in my sidebar
Why is my blog not secure?
For website owners/administrators
The “Not Secure” warning is being displayed on any page served over HTTP, which is an insecure protocol. … Using HTTPS requires that you obtain a TLS/SSL certificate(s), and then you can install that certificate and enable the HTTPS protocol on your web server.
Do I need SSL for my blog?
If your website is only a blog, with no products or memberships, and doesn’t even ask for any kind of information, then you don’t need an SSL Certificate. However, an SSL Certificate can help you increase the traffic
How do I install SSL on Blogger?
To enable HTTPS on custom dot com domain on blogger, go to draft.blogger.com and sign in using your Gmail account. The next thing is to select the blog on which you want to install SSL certificate. Now after selecting your blog go to Settings >> Basics. In the third step, we will enable HTTPS on custom domains
What is https availability?
HTTPS Availability lets your readers access your blog, using HTTP or HTTPS, as they choose. HTTPS Availability is now an option, for all blogs. HTTPS Redirect automatically requires all readers use HTTPS, to access your blog. HTTPS Redirect is an option, with HTTPS Availability enabled.
How do I get a TLS certificate?
Building an SSL/TLS certificate is as easy as one-two-three-four-five.
1. Determine the number of domains that need to be secured. …
2. Decide the level of identity assurance you want to provide to website visitors. …
3. Set aside a budget. …
4. Generate a certificate signing request, CSR.
How do I get an SSL certificate?
How To Order An SSL Certificate
1. Prepare by getting your server set up and getting your WHOIS record updated (it needs to show the correct company name and address), etc.
2. Generate the CSR on the server.
3. Submit the CSR and other info to the Certificate Authority.
4. Have your domain and company validated.
5. Receive and install the issued certificate.
Conclusion
आज की पोस्ट में हमने आपको Blogger Blog में HTTPS Enable करने के बारे में पूरी जानकारी हिंदी में दी हैं. आपने जाना की HTTPS क्या होता है?. हमे उम्मीद है कि यह Post “Blogger Blog में HTTPS Enable करने के बारे में पूरी जानकारी हिंदी में” आपके लिए उपयोगी साबित होगा.
अगर आप हमारी वेबसाइट के Latest Update पाना चाहते है, तो आपको हमारी Gujarati Help Guru की वेबसाइट को सब्सक्राइब करना होगा।
हमारे साथ जुड़ने के लिये Join Social Media: FB Page | Telegram | WhatsApp | Instagram | Twitter
फिर मिलेंगे आपसे ऐसे ही आवश्यक जानकारी लेकर तब तक के लिए अलविदा दोस्तों हमारी पोस्ट पढ़ने के लिए धन्यवाद।
💐आपका दिन शुभ हो।

